

Items 0
Total Price
Loyalty Points
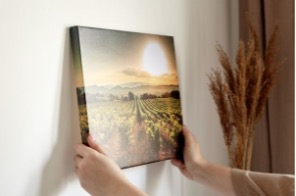
Hanging pictures is a fantastic way to personalise your living space and showcase your favourite art or memories. However, using nails can often damage walls, and it can be tricky to get the placement just right. This article explores various methods to hang pictures without nails, keeping your walls intact and allowing for flexibility when updating your décor.
From adhesive strips to innovative hooks, there's a solution available for every frame type and size. Let’s dive into the world of nail-free picture hanging and start sprucing up those walls.
When it comes to hanging pictures without using nails, understanding the key aspects can go a long way in ensuring a successful outcome. In this guide, we'll discuss the three fundamental aspects – choosing the right spot, selecting appropriate adhesives, and understanding wall surfaces – that you should bear in mind when decorating your walls.
First and foremost, take time to identify the perfect spot for your picture. Use a spirit level to ensure its straight and ask someone to hold the frame while you mark the top centre lightly on the wall. Remember, an optimally placed picture elevates the room's aesthetics and complements your existing interior design.
There is a wide variety of adhesive options to help you hang pictures nail-free:
Make sure to choose adhesives based on the weight of your picture, and always follow the instructions provided by the manufacturer.
Different types of wall surfaces demand specific considerations. Here's a brief rundown of the most common materials:
This section provides a brief step-by-step guide to hanging pictures without nails. Follow these simple steps to have your pictures hanging in no time.
Before you start, make sure to clean the wall thoroughly. Wipe it down with a damp cloth to remove any dust or dirt. This ensures that the adhesive strips will stick effectively.
First, gather all necessary materials, such as adhesive picture hanging strips and a spirit level. Adhesive picture hanging strips are perfect for hanging pictures without damaging your walls. Remove any protruding hardware from the back of your picture to ensure a flat surface, as the adhesive strips work best on even surfaces.
Next, attach the adhesive strips to the back of the picture frame by following the manufacturer's instructions. Usually, this involves securing two strips together with the Velcro side facing inwards and then attaching one side of the adhesive to the picture frame.
Ask someone to hold your picture frame in position against the wall. Use a pencil to mark the top centre of the picture lightly. You may also use a spirit level to ensure the frame is straight before making the mark.
After marking the position, carefully attach the picture to the wall by pressing the adhesive strips firmly against it. A top tip is to hold the picture in place for about 30 seconds to ensure that the adhesive bonds well with the wall.
Once your picture is up on the wall, double-check its position. Use the spirit level once more to confirm if the frame is aligned properly. If the placement doesn't look quite right, don't worry… Gently peel the picture from the wall, adjust the position and reattach it using the adhesive strips. Adhesive picture hanging strips provide some adjustments and can be removed without causing damage to your walls.
In this section, we'll explore a variety of alternative hanging methods to help you achieve the perfect display without causing any damage to your walls or frames.
Peel-and-stick hooks are a convenient and damage-free option for hanging your pictures. These hooks feature adhesives that stick to your wall and can be removed with ease. To use, simply clean the desired area, peel the backing off the hook, and stick it to the wall. Keep in mind to choose the right size and grip for your pictures, as they come in various weight capacities.
Another alternative hanging method are adhesive hangers. These hangers typically come in strips or squares, and can be placed on the back of your framed art or photos. Examples include picture hanging strips, which can safely hold certain weights without causing damage to your walls. Make sure to follow the manufacturer's instructions when using these products to ensure proper adhesion and support.
Why not get creative and hang your pictures from the ceiling? This unconventional approach can add an eye-catching perspective to your space. Simply purchase ceiling hooks and wire, attach the hooks to the ceiling, and suspend your framed art or photos using the wire. You may need to use additional hooks and wire if the picture is particularly heavy.
Lastly, if you're looking for a relaxed, casual vibe, consider leaning your framed art or pictures against a wall, shelf, or ledge. This method is not only effortless, but it's also perfect for spaces where you frequently change your wall décor. For added stability, you may use non-slip padding or adhesive grippers at the base of the frame to prevent it from sliding or falling.
Picture frames often need regular maintenance to keep them looking their best. In this section, we'll explore how to clean dust and debris from your frames, as well as safely remove adhesives when it's time to rearrange your wall art.
Over time, dust and debris can settle on your picture frames, making them appear dull and dirty. To keep your frames looking fresh, simply follow these steps:
When the time comes to remove your pictures from the wall, you'll need to do so without damaging the artwork, the frame or the wall. Follow these simple steps to safely remove adhesive picture hangers:
Easyframe specialise in offering a diverse range of frames that cater to your preferences and needs. With their extensive experience in the industry, they can provide you with expert advice on selecting the perfect frame for your artwork. Whether you're looking to purchase a frame or just seeking some guidance, you can easily reach out to Easyframe via phone at 01234 856 501 or email at sales@easyframe.co.uk. They are always willing to chat with you, even if you're not interested in making a purchase.
Article Posted: 22/02/2024 15:20:17